보통의 함수는 다음과 같이 사용한다.

const greet = (greeting, name) => {
  console.log(`${greeting} ${name}`);
}

greet('Hi', 'Tony');
greet('Hi', 'John');
greet('Hi', 'Tina');


함수를 연속해서 반환하는 커링(Currying)를 사용하면 다음과 같은 것이 가능해진다.

const curry = function(greeting) {
  return function(name) {
    console.log(`${greeting} ${name}`);
  }
}

const curriedGreet = curry('Hi');

curriedGreet('Tony');
curriedGreet('John');
curriedGreet('Tina');

이는 렉시컬 환경과 클로저에 의해 가능하다.

  1. const curriedGreet = curry('Hi'); 을 통해서 변수가 ‘Hi’로 정의된 렉시컬 환경을 갖는 클로저가 생성된다.
  2. curredGreet(’…’); 은 기존에 생성된 curredGreet의 클로저를 통해 실행된다.
    • greeting 변수와 name 변수가 사용되는데, greeting 변수는 curry(’Hi’) 에서 생성된 렉시컬 환경에서, name 변수는 curredGreet()을 호출하며 사용되는 파라미터로 사용된다.


위의 코드는 아래와 같이 간결하게 작성할 수 있다.

const curry = greeting => name => {
  console.log(`${greeting} ${name}`);
};

문제가 귀찮지만, 하나씩 뜯어보면 어렵지 않다. 

아무래도 '구현' 문제니까, 정답을 보기 전에 직접 구현해보기를 추천한다~~


구현사항이 많다.

  • 궁수 3마리 배치
  • bfs로 가까운 적 찾기
  • 적 삭제
  • 적 이동
  • 게임 종료

위의 사항들을 주석을 달아서 분리하거나, 함수화하여 문제를 해결하면 그래도 가독성 있게, 디버깅 쉽게 해결할 수 있다.

#include <iostream>
#include <queue>
#include <algorithm>

using namespace std;

int n,m,d, ans;
int arr[16][16], brr[16][16];
int dx[4] = {0, -1, 1,0}, dy[4] = {-1, 0, 0, 1};
queue< pair< int, int > > Q;

void bfs(int bow) {
  int vis[16][16] = {};
  auto bowP = make_pair(n, bow);
  vis[n][bow] = 1;

  Q.push(bowP);

  bool flag = 0;
  
  while(!Q.empty()) {
    auto cur = Q.front(); Q.pop();
    for(int i = 0; i < 4; i++) {
      int nx = cur.first + dx[i];
      int ny = cur.second + dy[i];
      if(nx < 0 || nx >= n + 1 || ny < 0 || ny >= m + 1) continue;
      
      if(vis[nx][ny]) continue;

      if(brr[nx][ny]) {
        vis[nx][ny] = vis[cur.first][cur.second] + 1;
        brr[nx][ny] = 2;
        flag = 1;
        break;
      }
      vis[nx][ny] = vis[cur.first][cur.second] + 1;
      if(vis[cur.first][cur.second] + 1 > d) continue;
      Q.push(make_pair(nx, ny));
    }
    if(flag) break;
  }

  while(!Q.empty()) Q.pop();
}

void fight(int fir, int sec, int thi) {

  int tmp = 0;

  for(int i = 0; i < n; i++) {
    for(int j = 0; j < m; j++) {
      brr[i][j] = arr[i][j];
    }
  }

  bool repeat = 1;

  while(repeat) {
    repeat = 0;
    
    // 궁수 하나씩 제일 가까운 적 찾기
    bfs(fir);
    bfs(sec);
    bfs(thi);  

    // 그 적 삭제하기
    for(int i = 0; i < n; i++) {
      for(int j = 0; j < m; j++) {
        if(brr[i][j] == 2) {
          brr[i][j] = 0;
          tmp++;
        }
      }
    }

    // 한 칸씩 내리기
    for(int i = n - 2; i >= 0; i--) {
      for(int j = 0; j < m; j++) {
        brr[i + 1][j] = brr[i][j];
        brr[i][j] = 0;
      }
    }

    // 비었나 체크
    for(int i = 0; i < n; i++) {
      for(int j = 0; j < m; j++) {
        if(brr[i][j]) repeat = 1;
      }
    }
  }

  ans = max(ans, tmp);
}


int main() {
  ios::sync_with_stdio(0);
  cin.tie(0);
  cout.tie(0);
  
  cin>>n>>m>>d;

  for(int i = 0; i < n; i++) {
    for(int j = 0; j < m; j++) {
      cin>>arr[i][j];
    }
  }

  for(int i = 0; i < m; i++) {
    for(int j = i + 1; j < m; j++) {
      for(int k = j + 1; k < m; k++) {
        fight(i, j, k);
      }
    }
  }

  cout<<ans;
}
⚠️ 이 게시물의 내용은 매~우 비효율적인 무한대댓글 구현을 다룬다.
⚠️ 익혀가는 과정을 적은 것일 뿐이고, 참고만 하는 것이 좋다 ! !

구현 결과부터 보여주자면 이렇게 잘 작동한다.

백, 프론트 둘 다 직접 구현해봤다.
예전에 작성했던 https://hwangjiwon1.tistory.com/64, https://hwangjiwon1.tistory.com/66 의 기억을 살려서 구현해보았다. 역시 생각만 해볼 때와 직접 구현해볼 때와의 난이도 차이는 천차만별이다. 링크드 리스트 + 트리 느낌.. 으로 해보았는데 힘들었다.
 

백엔드

가장 먼저 게시물과 댓글의 스키마를 알아야 추후의 내용을 이해하기 쉬울 것 같다.

// 게시물
const Post = new Schema({
  title: String,
  body: String,
  createdAt: {
    type: Date,
    default: Date.now
  },
  account: {
    type: mongoose.Types.ObjectId,
    ref: 'Account'
  },
  comments: [
    {
      type: mongoose.Types.ObjectId,
      ref: 'Comment'
    }
  ]
})

// 댓글
const Comment = new Schema({
  body: String,
  username: String,
  createdAt: {
    type: Date,
    default: Date.now
  },
  account: {
    type: mongoose.Types.ObjectId,
    ref: 'Account'
  },
  parent: {
    type: mongoose.Types.ObjectId,
    ref: 'Comment',
    default: null
  },
  children: [
    {
      type: mongoose.Types.ObjectId,
      ref: 'Comment'
    }
  ],
  depth: {
    type: Number,
    default: 0
  }
})
  1. 게시물에는 바로 달린 댓글(depth 0짜리)을 담는 comments 배열이 있다.
  2. 대댓글의 구현을 위해, 각 댓글에는 자신의 조상 댓글의 id를 담는 parent, 대댓글의 id를 담는 children 배열이 있다.

따라서 댓글이 하나의 게시물로부터 트리처럼 뻗어나갈 수 있다.
댓글과 그 대댓글들은 각자 참조하고 있는 id값을 통해서, 대댓글의 대댓글들을 무한히 확인할 수 있는 방식으로 구현되어있다.
 
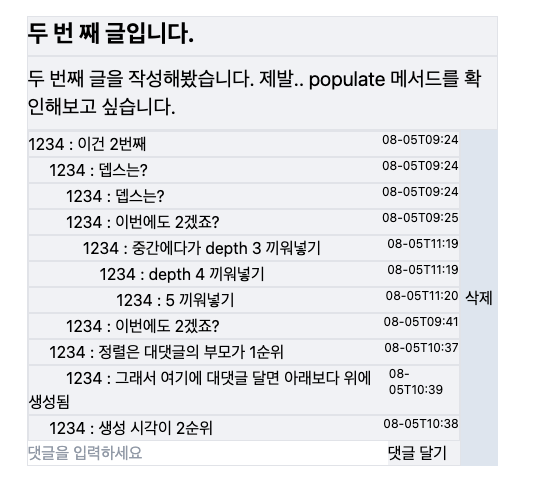
이건 Post의 댓글, 대댓글들을 재귀적으로 찾아주는 메소드이다. getRepliesRecursively() 내부의 populate()가 핵심이다. 댓글 1에 달린 대댓글 1-1이 있다면, 그 녀석은 댓글 2보다 상위노출 되어야한다. 따라서 DFS처럼 구현했다.
백엔드에서 주는 _id 값을 통해서 해당 _id에 해당하는 댓글이나 대댓글에 대댓글을 작성할 수 있다.

Post.methods.getComments = async function () {
  const comments = [];

  // 재귀적으로 댓글과 대댓글들을 뽑아내는 함수
  const getRepliesRecursively = async (commentId) => {
    
    const comment = await Comment.findById(commentId)?.populate('children');

    if (!comment) {
      return;
    }

    console.log(comment.body);

    comments.push({
      _id: comment._id,
      body: comment.body,
      username: comment.username,
      createdAt: comment.createdAt,
      depth: comment.depth,
    });

    for (const childId of comment.children) {
      await getRepliesRecursively(childId);
    }
  };

  // Post의 댓글들을 차례대로 순환하며 재귀적으로 대댓글 가져오기
  for (const commentId of this.comments) {
    await getRepliesRecursively(commentId);
  }

  return comments;
};

구현의 한계점

게시물의 댓글 배열, 댓글의 대댓글 배열에 실제 데이터가 아닌 id값만 갖고 있다. 이에 대한 단점은 아래와 같다.

  • Comment.findById(commentId)?.populate('children');에서 모든 댓글을 순환하며 탐색한다. 엄~~~~~~~청 느리다.
    • 모든 게시물의 모든 댓글을 가져올 때 O(모든 댓글 수^2)의 시간복잡도를 갖는다.
    • 댓글이 1만개만 되더라도 1억번의 연산을 거쳐야한다.
    • 훨씬 빠른 방법을 샤워하다가 생각해냈다. (나중에)
  • Model.findOne()은 O(N), Model.findOneById()는 O(1) 짜리 함수인 줄 알았다. 모델의 데이터마다 고유한 id를 가지니까… O(1)로 생각했다. 이는 오해였다.

What is the difference between Model.findOne() & Model.findById() in Mongoose?

Consider we are searching a document from MongoDB based on the _id value. Which one of the following code is efficient ? ModelObj.findById(IdValue).exec(callback); ModelObj.findOne({ '_id': IdValu...

stackoverflow.com

프론트

백엔드에서 가공을 전부 해줬다. 따라서 배열 하나에 모든 댓글이 다 들어있다.
프론트에서는 이런 값을 받는다.

더보기
[   // 댓글이 많이 달린 게시물
    {
      _id: new ObjectId("64ce154c7bbfe751997449fe"),
      body: '이건 2번째',
      username: '1234',
      createdAt: 2023-08-05T09:24:28.499Z,
      depth: 0
    },
    {
      _id: new ObjectId("64ce15607bbfe75199744a04"),
      body: '뎁스는?',
      username: '1234',
      createdAt: 2023-08-05T09:24:48.790Z,
      depth: 1
    },
    {
      _id: new ObjectId("64ce15687bbfe75199744a09"),
      body: '뎁스는?',
      username: '1234',
      createdAt: 2023-08-05T09:24:56.058Z,
      depth: 2
    },
    {
      _id: new ObjectId("64ce15747bbfe75199744a0e"),
      body: '이번에도 2겠죠?',
      username: '1234',
      createdAt: 2023-08-05T09:25:08.121Z,
      depth: 2
    },
    {
      _id: new ObjectId("64ce304a3454d9f34a4b8d48"),
      body: '중간에다가 depth 3 끼워넣기',
      username: '1234',
      createdAt: 2023-08-05T11:19:38.594Z,
      depth: 3
    },
    {
      _id: new ObjectId("64ce305c3454d9f34a4b8d4d"),
      body: 'depth 4 끼워넣기',
      username: '1234',
      createdAt: 2023-08-05T11:19:56.397Z,
      depth: 4
    },
    {
      _id: new ObjectId("64ce30633454d9f34a4b8d52"),
      body: '5 끼워넣기',
      username: '1234',
      createdAt: 2023-08-05T11:20:03.153Z,
      depth: 5
    },
    {
      _id: new ObjectId("64ce19595388b4089868fec8"),
      body: '이번에도 2겠죠?',
      username: '1234',
      createdAt: 2023-08-05T09:41:45.864Z,
      depth: 2
    },
    {
      _id: new ObjectId("64ce268605331dafbbac3928"),
      body: '정렬은 대댓글의 부모가 1순위',
      username: '1234',
      createdAt: 2023-08-05T10:37:58.591Z,
      depth: 1
    },
    {
      _id: new ObjectId("64ce26dd3640bcedce3e976a"),
      body: '그래서 여기에 대댓글 달면 아래보다 위에 생성됨',
      username: '1234',
      createdAt: 2023-08-05T10:39:25.009Z,
      depth: 2
    },
    {
      _id: new ObjectId("64ce269705331dafbbac392c"),
      body: '생성 시각이 2순위',
      username: '1234',
      createdAt: 2023-08-05T10:38:15.386Z,
      depth: 1
    }
]

depth를 토대로 사용자에게 보여주기만 하면 된다.
 
JSX에서 렌더링할 때, 연속된 공백은 하나의 공백으로 치환된다. 따라서 밑의 코드에서 2번 방식으로 작성해줘야 띄어쓰기를 제대로 출력할 수 있다.

// 안 되는 코드
const generateCommentForm = (comment) => {
    const space = '     '.repeat(comment.depth); // 여러개의 공백이 무시된다.

    return (
      <div className='flex justify-between'>
        <div>
          {space} {comment.username} : {comment.body}
        </div>
        <div className='text-xs'>
          {comment.createdAt.slice(5, 16)}
        </div>
      </div>
    )
  }

// 되는 코드
const generateCommentForm = (comment) => {
    const space = '\\u00A0\\u00A0\\u00A0\\u00A0'.repeat(comment.depth);

    return (
      <div className='flex justify-between'>
        <div>
          {space} {comment.username} : {comment.body}
        </div>
        <div className='text-xs'>
          {comment.createdAt.slice(5, 16)}
        </div>
      </div>
    )
  }


여기서 데이터도 변경해 보고, 벤치마크 직접 돌려볼 수 있다.

내가 넣은 데이터는 요녀석이었다.

{a: "hello", c: "test", po: 33, arr: [1, 2, 3, [4, [5, 6]]], anotherObj: {a: [1, 2, 3, [4, [5, 6]]], str: "whazzup"}};
 

JSBEN.CH Performance Benchmarking Playground for JavaScript


jsben.ch


결과를 그냥 말해주자면 아래의 사진과 같다.

Object.assign이 가장 빠르며, 유의미하게 lodash의 _.cloneDeep이 가장 느리다.


내가 구현한 커스텀 깊은 복사 메서드는 아래와 같다. 사이사이에 주석을 잘 달아놨으니, 읽어보면 이해가 잘 갈 것이다.

그래도 간단히 설명을 덧붙이자면 재귀적으로 구현했다. 배열이거나 객체면 깊게 들어가서 잘 반환해 주는 식이다.

function cloneDeep(obj) {
  if (typeof obj !== 'object' || obj === null) {
    // 객체가 아니거나 null인 경우 그대로 반환
    return obj;
  }

  if (Array.isArray(obj)) {
    // 배열인 경우 빈 배열 생성 후 요소들을 재귀적으로 복사
    return obj.map(item => cloneDeep(item));
  } else {
    // 객체인 경우 빈 객체 생성 후 속성들을 재귀적으로 복사
    const clonedObj = {};
    for (const key in obj) {
      clonedObj[key] = cloneDeep(obj[key]);
    }
    return clonedObj;
  }
}

lodash가 워낙에 무겁다고 해서 직접 구현도 해보고, 비교도 해봤는데 진짜 차이가 꽤 크긴 하다.

물론 내 구현 방식을 lodash의 deepClone과 비교해 봤을 때 빠진 부분이 분명히 많겠지만(정규식이라던가), 그래도 내가 만든 재귀적인 함수에서도 웬만한 데이터에서의 깊은 복사는 다 할 수 있을 것으로 예상이 된다.

JSON 객체를 이용한 깊은복사 역시 number, string, boolean, object, array, null 에서만 복사가 가능하다. 이를 생각해봤을 때 내가 만든 재귀와 비교해볼만한 메서드는 stringify + parse이며, 직접 구현해서 사용하면 훨씬 편하다는 것을 알 수 있다.

Object.assign은 얕은 복사니까 굳이 신경 쓰진 않겠다.. 그냥 얼마나 빠른지만 궁금했다.


결론

1. 귀찮아도 JSON으로 깊은 복사는 지양하자.


2. 재귀는 아직 내겐 '감'으로 짜는 영역인듯하다. mock 데이터 하나 머리로 떠올리고 함수 하나하나 내부로 들어가서 상상으로 돌려보면 골치 아프다. 최소한 펜이랑 종이는 있어야 할 듯

+ Recent posts